How To Create a Multi-Node MySQL Cluster on Ubuntu
MySQL cluster is a software technology which provides high availability and throughput. If you are already familiar with other cluster technologies, you will find MySQL cluster similar to them. In short, there is one or more management nodes which control the data nodes (where data is stored). After consulting with the management node, clients (MySQL clients, servers, or native APIs) connect directly to the data nodes.
You may wonder how MySQL replication is related to MySQL cluster. With the cluster there is no typical replication of data, but instead there is synchronization of the data nodes. For this purpose a special data engine must be used — NDBCluster (NDB). Think of the cluster as a single logical MySQL environment with redundant components. Thus, a MySQL cluster can participate in replication with other MySQL clusters.
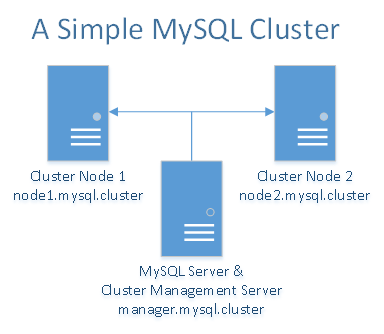
MySQL cluster works best in a shared-nothing environment. Ideally, no two components should share the same hardware. For simplicity, and demonstration purposes, we’ll limit ourselves to using only three Droplets. There will be two Droplets acting as data nodes which are syncing data between themselves. The third Droplet will be used for the cluster manager and at the same time for the MySQL server/client. If you have more Droplets, you can add more data nodes, separate the cluster manager from the MySQL server/client, and even add more Droplets as cluster managers and MySQL servers/clients.
Prerequisites
You will need a total of three Droplets — one Droplet for the MySQL cluster manager and the MySQL server/client and two Droplets for the redundant MySQL data nodes.
In the same DigitalOcean data center, create the following Droplets with private networking enabled:
- Three Ubuntu 16.04 Droplets with a minimum of 1 GB RAM and private networking enabled
- Non-root user with sudo privileges for each Droplet (Initial Server Setup with Ubuntu 16.04 explains how to set this up.)
MySQL cluster stores a lot of information in RAM. Each Droplet should have at least 1GB of RAM.
As mentioned in the private networking tutorial, be sure to setup custom records for the 3 Droplets. For the sake of simplicity and convenience, we’ll use the following custom records for each Droplet in the /etc/hosts file:
10.XXX.XX.X node1.mysql.cluster
10.YYY.YY.Y node2.mysql.cluster
10.ZZZ.ZZ.Z manager.mysql.cluster
Please replace the highlighted IPs with the private IPs of your Droplets correspondingly.
Except otherwise noted, all of the commands that require root privileges in this tutorial should be run as a non-root user with sudo privileges.
Step 1 — Downloading and Installing MySQL Cluster
At the time of writing this tutorial, the latest GPL version of the MySQL cluster is 7.4.11. The product is built on top of MySQL 5.6 and it includes:
- Cluster manager software
- Data node manager software
- MySQL 5.6 server and client binaries
You can download the free, Generally Available (GA) MySQL cluster release from the official MySQL cluster download page. From this page, choose the Debian Linux platform package, which is also suitable for Ubuntu. Also make sure to select the 32-bit or the 64-bit version depending on the architecture of your Droplets. Upload the installation package to each of your Droplets.
The installation instructions will be the same for all Droplets, so complete these steps on all 3 Droplets.
Before you start the installation, the libaio1 package must be installed since it is a dependency:
- sudo apt-get install libaio1
After that, install the MySQL cluster package:
- sudo dpkg -i mysql-cluster-gpl-7.4.11-debian7-x86_64.deb
Now you can find the MySQL cluster installation in the directory /opt/mysql/server-5.6/. We’ll be working especially with the bin directory (/opt/mysql/server-5.6/bin/) where all the binaries are.
The same installation steps should be performed on all three Droplets regardless of the fact that each will have different function — manager or data node.
Next, we will configure the MySQL cluster manager on each Droplet.
Step 2 — Configuring and Starting the Cluster Manager
In this step we’ll configure the MySQL cluster manager (manager.mysql.cluster). Its proper configuration will ensure correct synchronization and load distribution among the data nodes. All commands should be executed on Droplet manager.mysql.cluster.
The cluster manager is the first component which has to be started in any cluster. It needs a configuration file which is passed as an argument to its binary file. For convenience, we’ll use the file /var/lib/mysql-cluster/config.ini for its configuration.
On the manager.mysql.cluster Droplet, first create the directory where this file will reside (/var/lib/mysql-cluster):
- sudo mkdir /var/lib/mysql-cluster
Then create a file and start editing it with nano:
- sudo nano /var/lib/mysql-cluster/config.ini
This file should contain the following code:
[ndb_mgmd]
# Management process options:
hostname=manager.mysql.cluster  # Hostname of the manager
datadir=/var/lib/mysql-cluster  # Directory for the log files

[ndbd]
hostname=node1.mysql.cluster    # Hostname of the first data node
datadir=/usr/local/mysql/data   # Remote directory for the data files

[ndbd]
hostname=node2.mysql.cluster    # Hostname of the second data node
datadir=/usr/local/mysql/data   # Remote directory for the data files

[mysqld]
# SQL node options:
hostname=manager.mysql.cluster  # In our case the MySQL server/client is on the same Droplet as the cluster manager
For each of the above components we have defined a hostname parameter. This is an important security measure because only the specified hostname will be allowed to connect to the manager and participate in the cluster as per their designated role.
Furthermore, the hostname parameters specify on which interface the service will run. This matters, and is important for security, because in our case the above hostnames point to private IPs which we have specified in the /etc/hosts files. Thus, you cannot access any of the above services from outside of the private network.
In the above file you can add more redundant components such as data nodes (ndbd) or MySQL servers (mysqld) by just defining additional instances in the exactly the same manner.
Now you can start the manager for the first time by executing the ndb_mgmd binary and specifying the config file with the -f argument like this:
- sudo /opt/mysql/server-5.6/bin/ndb_mgmd -f /var/lib/mysql-cluster/config.ini
You should see a message about successful start similar to this:
MySQL Cluster Management Server mysql-5.6.29 ndb-7.4.11
You would probably like to have the management service started automatically with the server. The GA cluster release doesn’t come with a suitable startup script, but there are a few available online. For the beginning you can just add the start command to the /etc/rc.local file and the service will be automatically started during boot. First, though, you will have to make sure that /etc/rc.local is executed during the server startup. In Ubuntu 16.04 this requires running an additional command:
- sudo systemctl enable rc-local.service
Then open the file /etc/rc.local for editing:
- sudo nano /etc/rc.local
There add the start command before the exit line like this:
...
/opt/mysql/server-5.6/bin/ndb_mgmd -f /var/lib/mysql-cluster/config.ini
exit 0
Save and exit the file.
The cluster manager does not have to run all the time. It can be started, stopped, and restarted without downtime for the cluster. It is required only during the initial startup of the cluster nodes and the MySQL server/client.
Step 3 — Configuring and Starting the Data Nodes
Next we’ll configure the data nodes (node1.mysql.cluster and node2.mysql.cluster) to store the data files and support properly the NDB engine. All commands should be executed on both nodes. You can start first with node1.mysql.cluster and then repeat exactly the same steps on node2.mysql.cluster.
The data nodes read the configuration from the standard MySQL configuration file /etc/my.cnf and more specifically the part after the line [mysql_cluster]. Create this file with nano and start editing it:
- sudo nano /etc/my.cnf
Specify the hostname of the manager like this:
[mysql_cluster]
ndb-connectstring=manager.mysql.cluster
Save and exit the file.
Specifying the location of the manager is the only configuration needed for the node engine to start. The rest of the configuration will be taken from manager directly. In our example the data node will find out that its data directory is /usr/local/mysql/data as per the manager’s configuration. This directory has to be created on the node. You can do it with the command:
- sudo mkdir -p /usr/local/mysql/data
After that you can start the data node for the first time with the command:
- sudo /opt/mysql/server-5.6/bin/ndbd
After a successful start you should see a similar output:
2016-05-11 16:12:23 [ndbd] INFO — Angel connected to ‘manager.mysql.cluster:1186’ 2016-05-11 16:12:23 [ndbd] INFO — Angel allocated nodeid: 2
You should have the ndbd service started automatically with the server. The GA cluster release doesn’t come with a suitable startup script for this either. Just as we did for the cluster manager, let’s add the startup command to the /etc/rc.local file. Again, you will have to make sure that /etc/rc.local is executed during the server startup with the command:
- sudo systemctl enable rc-local.service
Then open the file /etc/rc.local for editing:
- sudo nano /etc/rc.local
Add the start command before the exit line like this:
...
/opt/mysql/server-5.6/bin/ndbd
exit 0
Save and exit the file.
Once you are finished with the first node, repeat exactly the same steps on the other node , which is node2.mysql.cluster in our example.
Step 4 — Configuring and Starting the MySQL Server and Client
A standard MySQL server, such as the one that is available in Ubuntu’s default apt repository, does not support the MySQL cluster engine NDB. That’s why you need a custom MySQL server installation. The cluster package which we already installed on the three Droplets comes with a MySQL server and a client too. As already mentioned, we’ll use the MySQL server and client on the management node (manager.mysql.cluster).
The configuration is stored again the default /etc/my.cnf file. On manager.mysql.cluster, open the configuration file:
- sudo nano /etc/my.cnf
Then add the following to it:
[mysqld]
ndbcluster # run NDB storage engine
...
Save and exit the file.
As per the best practices, the MySQL server should run under its own user (mysql) which belongs to its own group (again mysql). So let’s create first the group:
- sudo groupadd mysql
Then create the mysql user belonging to this group and make sure it cannot use shell by setting its shell path to /bin/false like this:
- sudo useradd -r -g mysql -s /bin/false mysql
The last requirement for the custom MySQL server installation is to create the default database. You can do it with the command:
- sudo /opt/mysql/server-5.6/scripts/mysql_install_db –user=mysql
For starting the MySQL server we’ll use the startup script from /opt/mysql/server-5.6/support-files/mysql.server. Copy it to the default init scripts directory under the name mysqld like this:
- sudo cp /opt/mysql/server-5.6/support-files/mysql.server /etc/init.d/mysqld
Enable the startup script and add it to the default runlevels with the command:
- sudo systemctl enable mysqld.service
Now we can start the MySQL server for the first time manually with the command:
- sudo systemctl start mysqld
As a MySQL client we’ll use again the custom binary which comes with the cluster installation. It has the following path: /opt/mysql/server-5.6/bin/mysql. For convenience let’s create a symbolic link to it in the default /usr/bin path:
- sudo ln -s /opt/mysql/server-5.6/bin/mysql /usr/bin/
Now you can start the client from the command line by simply typing mysql like this:
- mysql
You should see an output similar to:
Welcome to the MySQL monitor. Commands end with ; or \g. Your MySQL connection id is 3 Server version: 5.6.29-ndb-7.4.11-cluster-gpl MySQL Cluster Community Server (GPL)
To exit the MySQL prompt, simply type quit or press simultaneously CTRL-D.
The above is the first check to show that the MySQL cluster, server, and client are working. Next we’ll go through more detailed tests to confirm the cluster is working properly.
Testing the Cluster
At this point our simple MySQL cluster with one client, one server, one manager, and two data nodes should be complete. From the cluster manager Droplet (manager.mysql.cluster) open the management console with the command:
- sudo /opt/mysql/server-5.6/bin/ndb_mgm
Now the prompt should change to the cluster management console. It looks like this:
— NDB Cluster — Management Client — ndb_mgm>
Once inside the console execute the command SHOW like this:
- SHOW
You should see output similar to this one:
Connected to Management Server at: manager.mysql.cluster:1186 Cluster Configuration ——————— [ndbd(NDB)] 2 node(s) id=2 @10.135.27.42 (mysql-5.6.29 ndb-7.4.11, Nodegroup: 0, *) id=3 @10.135.27.43 (mysql-5.6.29 ndb-7.4.11, Nodegroup: 0) [ndb_mgmd(MGM)] 1 node(s) id=1 @10.135.27.51 (mysql-5.6.29 ndb-7.4.11) [mysqld(API)] 1 node(s) id=4 @10.135.27.51 (mysql-5.6.29 ndb-7.4.11)
The above shows that there are two data nodes with ids 2 and 3. They are active and connected. There is also one management node with id 1 and one MySQL server with id 4. You can find more information about each id by typing its number with the command STATUS like this:
- 2 STATUS
The above command would show you the status of node 2 along with its MySQL and NDB versions:
Node 2: started (mysql-5.6.29 ndb-7.4.11)
To exit the management console type quit.
The management console is very powerful and gives you many other options for managing the cluster and its data, including creating an online backup.
Let’s have a test with the MySQL client now. From the same Droplet, start the client with the mysql command for the MySQL root user. Please recall that we have created a symlink to it earlier.
- mysql -u root
\Your console will change to the MySQL client console. Once inside the MySQL client, run the command:
- SHOW ENGINE NDB STATUS \G
Now you should see all the information about the NDB cluster engine starting with the connection details:
*************************** 1. row *************************** Type: ndbcluster Name: connection Status: cluster_node_id=4, connected_host=manager.mysql.cluster, connected_port=1186, number_of_data_nodes=2, number_of_ready_data_nodes=2, connect_count=0 …
The most important information from above is the number of ready nodes — 2. This redundancy will allow your MySQL cluster to continue operating even if one of the data nodes fails while. At the same time your SQL queries will be load balanced to the two nodes.
You can try shutting down one of the data nodes in order to test the cluster stability. The simplest thing would be just to restart the whole Droplet in order to have a full test of the recovery process. You will see the value of number_of_ready_data_nodes change to 1 and back to 2 again as the node is restarted.
Working with the NDB Engine
To see how the cluster really works, let’s create a new table with the NDB engine and insert some data into it. Please note that in order to use the cluster functionality, the engine must be NDB. If you use InnoDB (default) or any other engine other than NDB, you will not make use of the cluster.
First, let’s create a database called cluster with the command:
- CREATE DATABASE cluster;
Next, switch to the new database:
- USE cluster;
Now, create a simple table called cluster_test like this:
- CREATE TABLE cluster_test (name VARCHAR(20), value VARCHAR(20)) ENGINE=ndbcluster;
We have explicitly specified above the engine ndbcluster in order to make use of the cluster. Next, we can start inserting data with a query like this:
- INSERT INTO cluster_test (name,value) VALUES(‘some_name’,’some_value’);
To verify the data has been inserted, run a select query like this:
- SELECT * FROM cluster_test;
When you are inserting and selecting data like this, you are load-balancing your queries between all the available data node, which are two in our example. With this scaling out you benefit both in terms of stability and performance.
Conclusion
As we have seen in this article, setting up a MySQL cluster can be simple and easy. Of course, there are many more advanced options and features which are worth mastering before bringing the cluster to your production environment. As always, make sure to have an adequate testing process because some problems could be very hard to solve later. For more information and further reading please go to the official documentation for MySQL cluster.
Need managed IRC hosting?
If you want a fully managed setup with installation, maintenance, and support for IRC servers and bots, explore our hosting services below: